
How to Seal Ductwork the Easy Way (4 Simple Steps)
The Best Materials for the Job (Choose Wisely!)
Let’s be real: if you want this project to actually be easy, you need the right gear.
First things first—leave the standard cloth duct tape in the toolbox. We know it’s called “duct tape,” but ironically, it turns into a gooey, peeling mess under HVAC heat and will fail in a matter of months. Instead, pros rely on two trusty sidekicks:
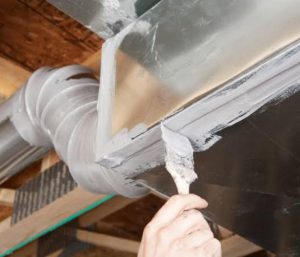
- Duct Mastic Sealant: Think of this as a thick, paste-like superglue for your ducts. You apply it with a paintbrush, and it dries into a flexible, permanent, and airtight shield. It is hands-down the MVP for large gaps and uneven joints.
- Aluminum Foil Tape (UL 181 Rated): This isn’t your kitchen foil. It’s heavy-duty metal tape engineered specifically for HVAC systems. It’s your go-to for flat seams and quick, reliable fixes.
Grab your materials, throw on some old clothes (mastic can be messy!), and let’s get those exposed ducts in your basement, attic, or crawl space sealed up.
Step 1: Inspect and Clean the Ducts
Turn on your HVAC fan and let your hands do the talking. Run them over the joints, elbows, and connections to physically feel for escaping air. Keep an eye out for visible gaps or old, sad-looking peeling tape.
Once you’ve played detective and found the leaks, wipe the area down with a damp cloth. Dust, grease, and grime are the enemies of adhesion. Let it dry completely before moving on.
Step 2: Seal Small Seams with Foil Tape
Got straight, flat seams where two pieces of metal meet? Foil tape is your easiest route.
- Cut a piece of tape just a bit longer than the seam.
- Peel off the backing and lay it firmly over the crack.
- The secret step: Use a plastic scraper or squeegee to press the tape down hard. Friction activates the acrylic adhesive, giving you a bond that actually lasts.
Step 3: Slather on Mastic for Large Gaps and Joints
Dealing with stubborn gaps, T-joints, or where flexible duct meets rigid duct? Mastic is about to be your best friend.
- Dip a stiff paintbrush (or a gloved hand) into the mastic.
- Slather it generously over the joint. You’re aiming for a thickness of about a nickel (roughly 2mm).
- Make sure to overlap the seal by at least an inch onto the clean metal on both sides of the crack.
Pro Tip: If you find a gap wider than 1/4 inch, don’t just bridge it with mastic. Apply a layer of fiberglass mesh tape over the crack first, then paint the mastic directly over the mesh for bulletproof support.
Step 4: Double-Check the Connections
Don’t forget the main event: the connection where your metal ducts meet the main HVAC plenum (that big metal box attached to your furnace or AC). This area takes the highest air pressure and is a notorious culprit for air loss. Be generous with the mastic here to guarantee a tight seal.
When to Call a Professional
Sealing accessible ductwork is a fantastic weekend DIY win, but we know not every duct is in the open. If you suspect major leaks hiding behind drywall, ceilings, or inside tight walls, it’s time to call in the cavalry. HVAC pros have specialized aerosol-based sealing technology that can reach those impossible spots.
Final Thoughts of How to Seal Ductwork The Easy Way:
Sealing your ductwork is easily one of the most cost-effective DIY projects you can tackle. With just a weekend afternoon and some high-quality mastic or UL-rated foil tape, you’ll protect your HVAC system, breathe cleaner air, and stop your hard-earned money from literally blowing out of the cracks.