
Repairing gaps in your ductwork is one of the most effective ways to improve your home’s energy efficiency, lower utility bills, and boost indoor air quality. According to the Department of Energy, the average home loses roughly 20% to 30% of the air moving through the duct system due to leaks, holes, and poor connections.
When leaking ducts cause temperature-controlled air to escape into your attic or crawlspace, your HVAC system has to work twice as hard. Luckily, learning how to fix gaps in ductwork is a straightforward DIY project.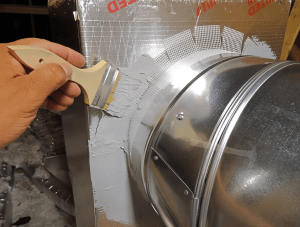
Here is your comprehensive, step-by-step guide to properly sealing your home’s air ducts.
Before you begin, gather the right equipment. Using the correct materials is the difference between a fix that lasts 10 years and one that fails in 10 months.
- Mastic Duct Sealant: This paste-like substance is the industry standard for sealing ductwork leaks. It can be applied from a bucket using a paint brush or via a caulking gun.
- Aluminum Foil Tape (Metal-Backed): If you prefer tape, it must be UL 181-rated aluminum foil tape designed specifically for HVAC systems.
- Fiberglass Mesh Tape: Crucial for reinforcing larger gaps or joints.
- Wire Brush & Rag: To clean the metal surfaces before application.
- Safety Gear: Heavy-duty gloves, safety goggles, and a dust mask (especially if working in a dusty attic).
- Ladder: For easy access to ductwork in attics, basements, or crawlspaces.
Important Warning: Never Use Ordinary Cloth “Duct Tape”!
Despite its confusing name, standard cloth duct tape is highly unsuitable for repairing air ducts. The constant thermal expansion and contraction of HVAC systems cause the adhesive on standard duct tape to dry out, rot, and fail within a year. Always stick to mastic sealant or aluminum foil tape.
Step 1: Turn Off the HVAC System
Safety first! Shut off your heating or air conditioning system at the thermostat or breaker panel. You do not want a blower fan kicking on, kicking up fiberglass dust, or blowing air through a joint while you are trying to apply sealant.
Step 2: Locate the Ductwork Leaks
Carefully inspect the air ducts, paying close attention to the joints, seams, and elbows where two sections of metal connect. Use these three methods to find hidden gaps:
- Visual Inspection: Look for obvious disconnections, streaks of dark dust near joints (which indicates air filtering out), or old, peeling tape.
- The Hand Test: Turn the system back on briefly. Run your hand over the joints to feel for escaping air streams.
- The Smoke Test: Hold a lit incense stick or a smoke pen near a suspected leak. If the smoke drifts wildly or gets blown away, you have found a gap.
Step 3: Clean the Repair Area
Dust, drywall grit, and old insulation will prevent mastic or tape from adhering to the metal. Use a wire brush to scrub away rust or debris, then wipe the area clean with a damp rag. Let it dry completely.
Step 4: Apply the Sealant or Foil Tape
Depending on the size of the gap, choose one of these two professional methods:
Method A: For Small Cracks and Seams (Using Mastic Sealant)
1. Dip a cheap paintbrush into the mastic sealant (or use a caulking gun).
2. Paint a thick, continuous layer over the crack, extending about 2 to 3 cm (1 inch) past the edges of the gap onto the surrounding metal.
3.Advanced Tip: For gaps wider than 1/4 inch, embed a strip of fiberglass mesh tape directly into a wet layer of mastic, then paint a second layer of mastic over the top. This creates a reinforced bridge that won’t crack.
Method B: For Straight Seams (Using Aluminum Foil Tape)
1. Cut a piece of UL-rated aluminum foil tape long enough to cover the seam with an extra inch of overlap
2. Peel back the paper backing and press the tape firmly over the joint.
3. a plastic squeegee, scraper, or a flat tool to firmly rub the tape down. This activates the acrylic adhesive and ensures it molds into the contours of the metal without trapping air bubbles.
Step 5: Wrap with Duct Insulation (Highly Recommended)
If your ductwork runs through an unconditioned space,like a scorching summer attic or a freezing winter basement—simply sealing the leaks is only half the battle. Once your mastic is completely dry, wrap the exterior of the ducts in specialized fiberglass duct insulation to prevent thermal loss.
While a homeowner can easily seal accessible ductwork, you should call a licensed HVAC professional if you encounter these scenarios:
- Inaccessible Ducts: The leaking sections are hidden deep inside finished walls, ceilings, or tight crawlspaces.
- Severe Damage: The metal ductwork is crushed, collapsed, or extensively corroded.
- System Balancing Issues: You suspect major trunk lines are disconnected, causing uneven heating or cooling throughout the house.
Professionals can perform a Duct Blaster Test, which pressurizes your system to measure exact airflow leakage. They also have access to advanced technologies like aeroseal technology—an aerosolized sealant mist injected into the system that automatically seals microscopic cracks from the inside out.