
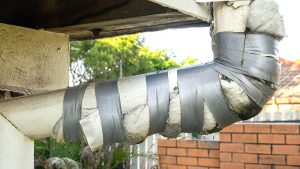
What is a common mistake in ductwork installation?
Industry data shows that even minor leaks at the joints can waste 15% to 30% of your airflow. That means the cold air your system worked so hard to produce is literally vanishing before it ever hits the room.
After managing numerous MEP installations, I’ve seen the same mistakes repeated over and over. Here are the 3 biggest ductwork pitfalls you need to watch out for on-site—especially when it comes to the final sealing stage.
1. Poor Sizing and Too Many Sharp Bends
Duct sizing requires precise static pressure calculations. If a duct is choked down too small or oversized, you’ll get massive velocity issues and uneven hot/cold spots. Furthermore, when installers take shortcuts and run too many sharp 90-degree elbows or dead ends, airflow resistance skyrockets. The compressor and fan motor end up working overtime, spiking energy consumption and killing the equipment’s lifespan.
2. Skimped Supports and Misalignment
Ductwork needs structural integrity. On a lot of job sites, you’ll see excessively wide hanger spacing or a complete lack of anti-sway bracing on horizontal runs over 20 meters. Once the system starts cycling, the ducts will shake, create noise, and eventually sag or crack at the joints. I’ve also seen crews try to “hard-connect” diffusers directly to the main duct trunk or skip wall sleeves completely—both are guaranteed recipes for air leaks.
3. Flimsy Insulation and Vapor Barrier Breaks
If ducts run through unconditioned zones like attics, drop ceilings, or basements without proper insulation, your cold air gets pre-heated before arrival. Worse, if the insulation jacket isn’t tightly taped and sealed, moisture will condense on the cold metal surface. That leads to dripping water, ruined drywall, and toxic mold growth inside the ceilings.
While poor layout and bad hangers are visible issues, duct leakage is a hidden killer.
A lot of residential or low-budget installers love to slap standard cloth duct tape on joints because it’s cheap and fast. But standard adhesives cannot handle constant thermal expansion and contraction. Within months, the glue dries out, cracks, and peels right off.
If you want a system that actually holds pressure and meets building energy codes, you need to mandate professional solutions:
HVAC-Grade Aluminum Foil Tape: Use a high-tack, weather-resistant foil tape specifically rated for duct systems. It won’t degrade under continuous thermal cycling.
Water-Based Mastic/Sealant: For joints, seams, and rivets, brushing or spraying a premium water-based duct sealant is non-negotiable. Once cured, it forms a flexible, airtight skin that can handle continuous system vibrations without cracking.
Engineered Flange Gaskets: Stop using hard rubber or makeshift packing at flange connections. Stick to flame-retardant specialized sealing tapes (like 8501 tape) or high-elasticity gaskets. They seal perfectly and keep the inspector happy during fire safety and energy-saving compliance checks.
HVAC is the ultimate “hidden project”—70% of the quality depends on how it’s installed, not just the brand of the equipment.
Saving a few dollars on cheap tape or skipping sealant during the rough-in stage is a massive unforced error. You might save fifty bucks on material today, only to pay thousands more in utility bills and remediation costs down the road.